Thursday, June 23, 2016

Power BI - Replacing Values using the Query Editor

Data sets can have data problems. Often it's an unknown value populated with filler. For this example, we imported data from our Google Analytics and found that our Country Column had unknown values populated with the phrase: (not set). For our report, Unknown would be a better.

Using Power BI Desktop, changing (not set) to Unknown is a simple task.

Detailed

From the Home tab, first select the table (Country for this example) and then click on the Edit Queries button:


This opens the query editor. Our objective is to replace the value (not set) with the value Unknown.


Replace Value Pop-up

You have two approaches to starting the Replace Values pop-up window. For both, first highlight the offending value - notice that the first row with the value (not set) is highlighted (dark gray).  

You can also select the entire column. But, if you select a specific value in a row, the Replace Value pop-up is pre-populated with the offending value.  Useful if the value has any special characters.

Once you have highlighted the value, either select the Replace Values button, or right click on your mouse and then select Replace Values.


Both approaches open the Replace Values pop-up.


Type in the new value - here it was 'Unknown.' And then click on the 'OK' button.


The values are now updated.  

Changes and Adjustments

If you need to make a change to the new value, simply click on the 'Gear' to the right of the Applied Steps transformation labeled Replaced Values.  


This brings up the Replace Values pop-up, pre-populated with the original value (not set) and the original Replacement value.  Just alter the 'Replace With' value, and click on 'OK'.


Power BI - Edit query to add back a column

In building reports and queries, it is good practice to select only the columns you need. Power BI makes this easy, but what if you now need a column you originally omitted?  Or, to remove unwanted columns. They both follow the same approach.

With Power BI, all you need to do is use the query editor.

Overview


  1. Start the Query Editor
  2. Select your query (typically a table)
  3. Edit the Column List using the Choose Columns pop-up - two approaches:
    1. Manage Columns button
    2. Applied Steps listing
      1. Locate the Applied Step where the columns were filtered out
      2. Click on the 'Gear' for Applied Step where you removed the columns
  4. In the Choose Columns pop-up, select the new column(s)
  5. Click 'OK'

That's it.


The Details


To get started, on the main page, start the query editor:


This brings up the query editor.
Once the editor has started, select the target query. For this example, we selected the FactInternetSales query.

Click on the Manage Columns button to bring up the Choose Columns pop-up. Alternatively, you can review the Applied Steps section and locate the step where you filtered out the column.  Applied Steps provides a chronological listing of filters that you made to the raw data source. Locate the step where you removed columns. It's labeled:  Removed Other Columns. Locate the 'Gear' to the right of the Applied Step, and click on it.


Both approaches bring up the detailed choose column editor.


Choose Columns Pop-up

With the Choose Column pop-up, select the new columns to be added.  Or, remove any unwanted columns. Select 'OK' and your query columns have been updated to the results set.


Monday, June 13, 2016

SSRS 2016 - Create a Shared DataSet

The creation of a shared dataset first starts with a shared data source. ( see SSRS 2016 - Create a Shared Data Source).  And like shared data sources, shared datasets are effectively objects of the report server that reside on the report server.

Once you have a shared data source, you use the Report Builder to create a new shared dataset.
Here, you can simply startup the Report Builder, or start from the SSRS web portal, which takes you to the New Report of Dataset form within Report Builder.  Be sure to get the latest Report Builder. You can find the link to the latest version here - SSRS 2016 - stand alone Report Builder gets an update.

Summary:

  1. Navigate to the New Report or Dataset form in Report Builder
    1. From the SSRS web portal
      1. Login into the portal (typically http[s]://[servername]/reports )
      2. Click on the menu item +New
      3. Select Dataset
    2. From within Report Builder
      1. Menu:  File | New 
      2. Popup: Choose New Dataset from the options on the left of the
        New Report or Dataset form
  2. Select your desired shared data source from the list
  3. Build your query in the Query Designer
    1. either as text
    2. or with the designer tools
  4. Save your shared dataset

Report Builder connected to your SSRS server

Report Builder will need to be connected to your desired SSRS server. You can verify the connection simply by reviewing the current report server listed at the bottom of the report builder screen. 


If you need to update or adjust this, follow the menu:  File | Options (button)


New Report or Dataset

Once you have navigated to the New Dataset section of the New Report or Dataset form, you are ready to select the desired shared data source. A shared dataset, as an object of the report server, requires a shared data source. Make your choice and the select the Create button.


Dataset Query Designer

This takes you to the dataset query designer.  You can switch to the "Edit as Text" form, or use the graphical query designers tools and options to build your query.  


Stored Procedure or Text (Select)

One of the great features of SSRS is the ability to run stored procedures. If you are using a stored procedure, locate the Command Type combo box, and choose Stored Procedure.


Saving

Once the query is all set and tested, use the menu commands File | Save (or Save as). This will bring up a Save as Dataset popup.  Add your desired dataset name, and click OK.  Your shared dataset is now ready to be used.

You can find the MSDN details on datasets here:  Report Embedded Datasets and Shared Datasets (Report Builder and SSRS)


SSRS 2016 - Create a Shared Data Source

The easiest way to create a shared data source in SSRS 2016 is to start with the reporting services web portal. Remember that a shared data source is an object of the report server.  At this time, I have not worked out a way to created a shared data source from within the 2016 Report Builder. 

Summary:
  1. Login into the portal (typically http[s]://[servername]/reports )
  2. Click on the menu item +New
  3. Select Data Source
  4. Add data source properties and save


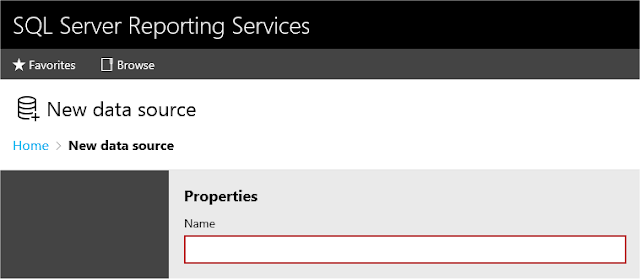
Select +New Data Source


Add new data source form


Newly created Data Source

Using a Shared Data Source

With the data source created, you can now use it in Report Builder. Simply right click on Data Sources, and select New Data Source:

Add New Data Source

In the Data Source Properties, select "Use a shared connection or report model" [the default value], and then click on the Browse button.


Use a shared connection or report model

This will bring up the available list of data sources registered with your SSRS server.

Select desired Data Source

Highlight the desired data source, and click on the 'Open' button. The Data Source properties window will now have your selected data source. Test Connection and then click on "OK"


New Data Source Properties


After clicking on "OK" your new shared data source is listed.  Notice the small box with the curved arrow - that tells you it is a shared data source.


Thursday, June 9, 2016

SSRS 2016 - Setup Admin and User access to your report server

After installation of SSRS,2016, as well as with older versions, the only user that has access is the account that did the installation.  Usually a system administrator. And how to get access to SSRS is a often popular question.  For 2016, here are the steps to setup a new user so they can gain access to SSRS.

1. Settings:                            - select the Settings button on the top right
2. Site Settings menu:       - select the Site settings menu item
3. Security:                           - on the left menu, select Security
4. Add group or user         - select the + Add group or user button  
5. Group or user:                 - type in your new group or user and select the correct role(s) 


Setting Option on the Top Menu

Sites settings menu option


Security Menu option on the left bar


+ Add group or user form

SQL 2016 - SSRS - Error 503

After setting up SQL Server 2016 Reporting Services, you cannot connect to the new SSRS 2016 Web Portal.   For the the June 1, 2016 General Availability (GA) release, the URL is http://[ComputerName]/reports.

We had issues with the pre-release versions, and with the initial setup of SSRS, we still have an occasional Error 503.


After stopping, and restarting the SSRS service using the SS Configuration Manager, we were able to connect to the new SSRS service.

SQL 2016 - Installation Summary File location

Looking for the location of your SQL Server 2016 installation summary file?  Typically, it's in a folder similar to this one:

C:\Program Files\Microsoft SQL Server\130\Setup Bootstrap\
Log\20160609_064956\Summary_WS12SQL2016_20160609_064956.txt   


SQL 2016 - Configuration File location

Looking for the location of your SQL Server 2016 install Configuration file?  Typically, it's in a folder similar to this one:

C:\Program Files\Microsoft SQL Server\130\Setup Bootstrap\
Log\20160609_064956\ConfigurationFile.ini   


SQL Server 2016 - Collation Defaults

For the US installation, the default database and analysis services collation defaults are as follows:

Database Engine:   SQL_Latin1_General_CP1_CI_AS

Analysis Services:  Latin1_General_CI_AS


PolyBase - Port Range Defaults

When installing PolyBase, the default port range is  16450 - 16460.


It would appear, that you can verify your running value here:

SELECT * FROM [DWConfiguration].[dbo].[configuration_properties]
  where [key] = 'ManagerControlPort';

Monday, June 6, 2016

Loading data into Azure SQL Data Warehouse

Robert Sheldon at Simple Talk has written an excellent introduction on loading data into the Azure SQL Data Warehouse. you can find it here:  Using SSIS to Load Data into Azure SQL Data Warehouse.

Wednesday, June 1, 2016

SQL Server 2016 Now Available - June 1, 2106

Via email, Microsoft announced general availability (GA) for SQL Server 2016.

The latest SQL Server has made great advances, especially in significant enhancements to the supplemental components, along with the core database engine.  SSRS was completely overhauled (see my article in Redmond Magazine: SSRS Steps up in the shadow of Power BI). Master Data Services has been enhanced, and PolyBase, the magic bridge between the relational world and the unstructured world, has been included into the core, standalone system (see my PolyBase page reference guide: PolyBase).  You can find a summary of the enhancements and changes to SQL Server 2016 in my article SQL Server 2016 Preview Reveals path to Azure and Big Data.